Menus
In the last tutorial on visual programming we covered creating dialog boxes with simple buttons. That application consisted of a single dialog box. In fact, many simple applications that don't use menus are really just dialog boxes. However, more often we see applications that have menus that call up dialog boxes to get information. This implementation of menus and dialog boxes is covered here.
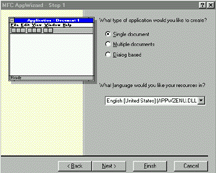
| First, start a new MFC AppWizard executable project. In the next dialog box select Single Dialog application as shown in the diagram here. Choose Finish and the project will be created. | |
| Next, choose the second (green) tab, which is the resource tab. Then right-click on the folder that says dialog and choose Insert Dialog. | 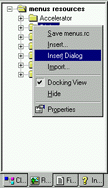 |
| You should now see a dialog box that looks like the one you created last time. You may change its name by right-clicking on it and choosing Properties. You can add static text and buttons as you did in the last exercise. Now right-click outside of the dialog box and choose Class Wizard. You will be prompted with a choice that asks if you want to create a new class. Click ok. Name it CMyDialog and click OK. | 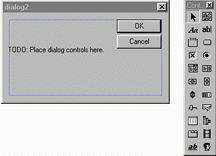 |
| Now let's add a menu function that calls up this dialog box. Go back to the resource tab and find the folder that says Menu. Open that folder and double-click on the only item in that folder IDR_MAINFRAME. You should see a standard menu appear on the right side. Go to the file menu and double-click on the empty space at the bottom of the list. A menu item properties box will appear. Fill in the ID as ID_FILE_DIALOG (the ID is a standard start, FILE represents the menu that it is in, and DIALOG is the menu item). Then enter &Dialog for the caption and click on the x to dismiss the dialog. | 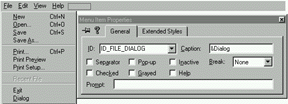 |
| Right-click on the menu area and choose class wizard to implement some action for the menu entry which you just created. Select ID_FILE_DIALOG from the OBJECT IDs menu and COMMAND from the Messages window. Then click Add Function and the Edit Code. | 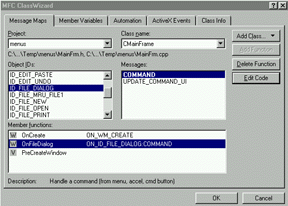 |
You will be brought to a section of code for this command. To bring up the dialog box that you have already created enter this code
CMyDialog dlgTest;


if(dlgTest.DoModal()==IDOK)

    AfxMessageBox("OK button pressed");

else

    AfxMessageBox("Cancel button pressed");
You must also add the line
#include "MyDialog.h"
to the top of the file that you were just placed in.
The first line defines a new dialog box of the type you just created (remember you called the type of dialog box you created CMyDialog). The particular dialog box you will be using is called dlgTest. The next line is the most important. It puts the dialog box on the screen with the command dlgTest.DoModal(), but it also receives input back from the box. If the message received is IDOK (see the last dialog box tutorial for more information) then it displays a message box (also see last time) that says ok was pressed, otherwise it knows that cancel was pressed. Try running this program.
Text Boxes
| Let's go back to the dialog box we created by clicking on the resource tab, and double-clicking on IDD_DIALOG1 (or whatever you named your dialog box). Find the control that is an edit box (it says "ab"), and drag one to your dialog box. Then right-click on the box itself and change the name to IDC_MYEDIT. You can then click the x box on the Edit Properties box to close. | 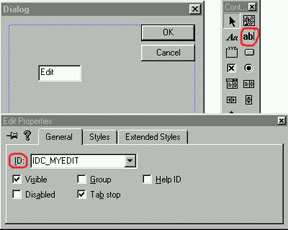 |
| Now, right-click on the on the dialog box and choose Class Wizard to add the facility for extracting text from the box which you just placed. Click on the Member Variables tab and make sure that CMyDialog is the selected class. Now click on IDC_MYEDIT and choose add variable. You will be prompted to complete the variable name which begins m_. Call the variable m_myedit. Leave the category alone. You will notice that you can choose from several types of variables including ints, and floats. This describes the type of data that will be input in the text box. For now, we will choose CString which is very much like APString. Then click OK and OK again. |  |
Now, let's modify the code from the previous dialog box to take advantage of the new text box which we just added. Go to the class tab (blue, pink and teal) and find CMainFrame. Open that up and find OnFileDialog, and double-click on it. You should be brought to the code that you typed in previously. Change the code to the following
CMyDialog dlgTest;


    if(dlgTest.DoModal()==IDOK)

    {

        if (dlgTest.m_myedit=="password")

            AfxMessageBox("You got the password");

        else

            AfxMessageBox("Sorry you are wrong");

    }

    else

        AfxMessageBox("Cancel button pressed");
The new line here is if(dlgTest.m_myedit=="password"). Essentially, this line says if what you typed in was "password" then... The reason for the formatting of dlgTest.m_myedit is that the variable that we created m_myedit is a part of the dialog box itself so we must use the dot notation to signify that m_myedit is a part of the dialog box dlgTest. Try this program out.
Globals
If you want to actually implement some of these techniques into a program without knowing a lot more about classes, it is helpful to use global variables. There are three steps to using global variables which I will outline here without much explanation for now. It later semesters this topic will be covered further.
First, go to the class tab and find the folder that says globals. Double-click on the entry that is there. Now enter your global variables that you need following the one that is listed.
Next go to file and new and create a new C++ header file. Name it globals.h. Now type in all of the globals that you just entered into the previous section preceding each of them with the word "extern." For example if you type "int mynumber" first, then you would type "extern int mynumber" in the header file. Save this file.
Now whenever you need to use any of these global variables in part of your program, go up to the top of the file in which you are working, and insert the line #include "globals.h"
The few brief sections that we have covered in visual programming are probably enough to write your final project with a GUI, but it will be difficult. There will be some more texts on the subject in class if you wish to attempt this.
